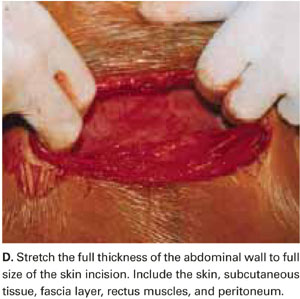
Digitally stretching the full-thickness abdominal incision is easily achieved due to the mechanical stretching of the anterior abdominal wall, edema, and increased vascularization that occur during pregnancy.
FIGURE 1A Create a modified abdominal incision
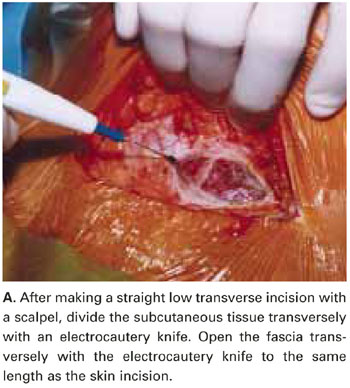
FIGURE 1B Create a modified abdominal incision
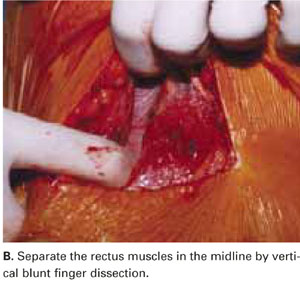
FIGURE 1C Create a modified abdominal incision
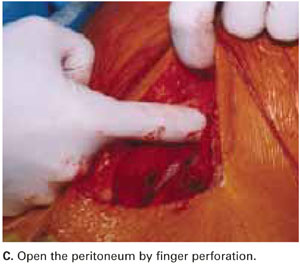
FIGURE 1D Create a modified abdominal incision
Retractor facilitates exposure
Our positive experience with the soft, self-retaining abdominal retractor for minilaparotomy and laparotomy6-8 compelled us to incorporate its use for cesarean 3 years ago.
The device consists of a flexible plastic inner ring and a firmer outer ring connected by a soft plastic sleeve. We use the large size of either of the 2 models currently available: the Mobius (Apple Medical Corporation, Marlboro, Miss) and the Protractor (Weck Closure Systems, Research Triangle Park, NC).
Introduce a hand through the laparotomy incision and evaluate the pelvis to ensure that no significant adhesions are present that may interfere with swift placement of the inner ring. If significant adhesions are found, use traditional metal retractors instead.
Squeeze the inner ring and insert it into the abdominal cavity toward the patient’s head, allowing the device to spring open against the parietal peritoneum (FIGURE 2A). Apply upper traction and elevate the superior edge of the abdominal incision to facilitate placement. Perform a digital check to ensure no tissue is trapped between the inner ring and the abdominal wall.
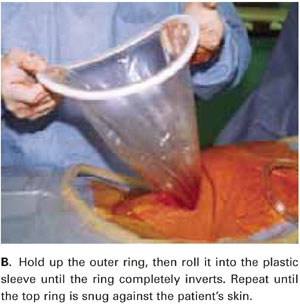
Hold up the outer ring, then roll the plastic sleeve until the ring completely inverts (FIGURE 2B). Repeat the process until the top ring is snug against the patient’s skin.
Advantages of the soft, self-retaining abdominal retractor include atraumatic retraction; incision protection; and adjustable height, making it ideal for obese patients.
FIGURE 2A Place the abdominal retractor
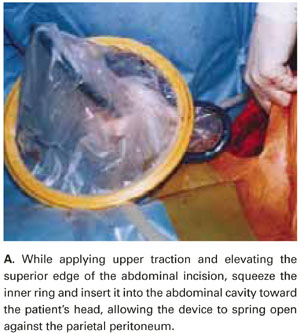
FIGURE 2B Place the abdominal retractor
Transverse hysterotomy in lower uterine segment
Make a transverse 2-cm uterine incision with a scalpel, approximately 1 cm above the vesicouterine peritoneal fold (identify this using gentle digital pressure to elevate the uterus) (FIGURE 3A).
Traditional bladder dissection is eliminated. We have found that when an adequate transverse hysterotomy is performed, a bladder flap is not required.1-3 In a recent randomized trial, Hohlagschwandtner et al9 confirmed our findings that bladder-flap omission was associated with reduced operative time and incision-delivery interval, decreased blood loss, and less need for postoperative analgesics.
An additional advantage of this omission: We can avoid making the uterine incision too low—especially when the cervix is fully dilated. Further, making the hysterotomy (uterine serosa and myometrium together) slightly above the vesicouterine peritoneal fold without bladder flap dissection frees the loose connective tissue between the uterus and the urinary bladder, allowing the spontaneous descent of the bladder.
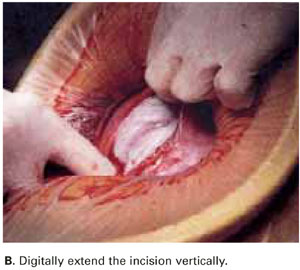
Digitally extend the transverse uterine incision. We extend the initial incision not laterally but, instead, vertically (FIGURE 3B). The vertical digital traction on the initial transverse uterine incision creates a transverse dissociation of the horizontal myometrium fibers; this results in a transverse extension of the original incision.
This modification prevents unintended and uncontrolled lateral extensions of the incision that may lacerate the uterine vessels.10 It also prevents the uterine incision from becoming an inverted “U” and the undesirable accumulation of myometrium fibers at the ends of the incision. Such incisions usually do not reapproximate well during hysterotomy closure and may lead to sacculation-type defects.11
FIGURE 3A Use a standard hysterotomy in the lower uterine segment
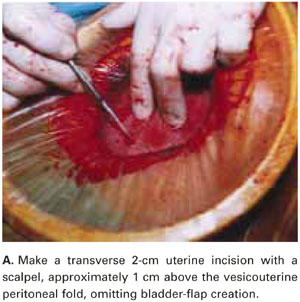
FIGURE 3B Use a standard hysterotomy in the lower uterine segment
Delivering the fetus
For vertex presentations, place your hand into the uterine cavity between the lower edge of the hysterotomy and fetal head. While applying transabdominal fundal pressure, lift the head with your fingers and deliver it through the incision (FIGURE 4A).
The self-retaining retractor facilitates delivery of the fetal head by creating a rigid border around the abdominal incision. The back of the surgeon’s hand that is in the uterine cavity achieves better leverage, as it now rests on a rigid plane on the inferior part of the incision rather than on the back hand and the softer and pliable wound edge of the standard abdominal incision.
Vacuum-assistance. When delivery of the fetal head proves difficult, we use the soft vacuum cup, which avoids unnecessary intrauterine manipulation that may result in fetal or maternal trauma (FIGURE 4B).12
Breech extraction or transverse lie delivery is performed using standard extraction maneuvers (FIGURE 4C).13 We have found no need to perform T or J vertical extensions of the low transverse uterine incision, even in cases of a poorly developed lower uterine segment, abnormal presentation, or prematurity.