Once the fibroid is resected to the level of the endometrium, remove the fibroid chips (FIGURE 2). Often, when the hysteroscope is removed and uterine distention is reestablished, more of the fibroid will protrude into the cavity, facilitating safe resection. At some point, the fibroid will no longer protrude into the cavity; it will have been removed or only a small percentage will remain intramural.
Often, when more than 70% or 80% of the fibroid has been resected, the remainder will slough spontaneously over the next 2 to 4 months. The technique for removing the intramural fibroid is described on page 78 (FIGURE 3).
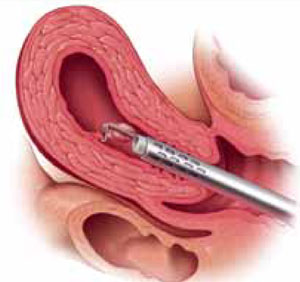
Type II. The first step in resecting a Type II myoma is shaving the intracavitary portion to the level of the endometrium, as in the resection of a Type I fibroid. Often, once a small Type II myoma is “unroofed,” the remainder will spontaneously fall into the cavity and can easily be removed.
Larger Type II myomas require a different approach. In these, the goal is to identify the pseudo-capsular plane that allows for blunt dissection. Once you have identified it, use the loop electrode to bluntly dissect (without RF activation) the fibroid from the myometrium. Place the electrode in the capsular plane and retract as much of the myoma into the cavity as possible (FIGURE 4). Another way to do this is to use a twisting motion—similar to those performed in open myomectomies—with the optical tenaculum. Once the fibroid is in the cavity, shave it to the level of the endometrium. Repeat this technique until you have removed as much of the fibroid as possible. Use minimal distention pressure when you perform this technique so that the fibroid will not be pressed back into the myometrium.
Underutilization of hysteroscopic myomectomy may be due to inadequate training in the technique or a misconception that it is difficult to learn. Fortunately, hysteroscope manufacturers are beginning to offer physicians and operating room personnel didactic and hands-on laboratory courses.
FIGURE 1 Surgical technique for removing Type 0, I, II fibroids
Type 0. The loop is placed behind the fibroid. Once activated, the loop is drawn toward the operator to resect the pedicle.
FIGURE 2 Surgical technique for removing Type 0, I, II fibroids

Type I. The myoma is resected to the level of the myometrium.
FIGURE 3 Surgical technique for removing Type 0, I, II fibroids
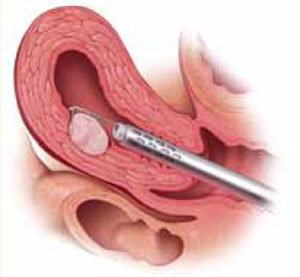
Resection of intramural portion of Type I and II. The resectoscopic loop is placed in the pseudocapsular lane between the fibroid and the myometrium to bluntly dissect the fibroid into the cavity for further resection.
FIGURE 4 Surgical technique for removing Type 0, I, II fibroids
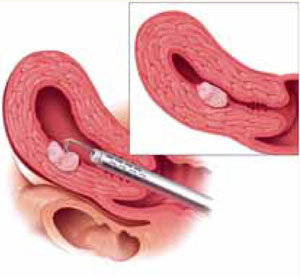
Type II. The roof of the myoma is shaved off to the level of the myometrium. The insert demonstrates the intramural portion of the myoma that will protrude into the cavity with a reduction in uterine distension pressure.
FIGURE 5 Resect technique—4 steps in resecting a submucous myoma
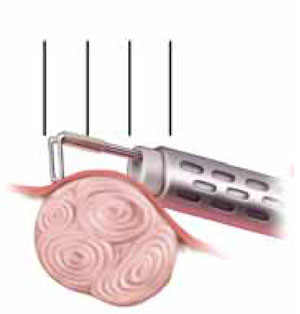
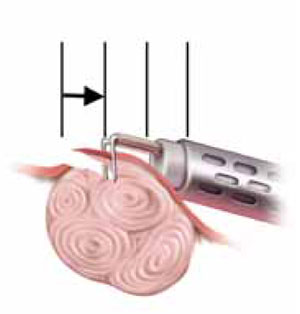
The loop is placed behind the fibroid with maximal contact with the tissue before RF activation.
FIGURE 6 Resect technique—4 steps in resecting a submucous myoma
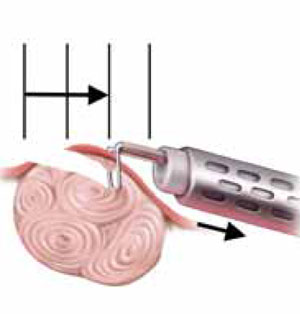
The loop is withdrawn toward the operator (see arrow) while cutting the myoma but not so far as to obstruct the hysteroscopic view.
FIGURE 7 Resect technique—4 steps in resecting a submucous myoma
The loop is held in place while the hysteroscope is withdrawn (arrows indicate how to remain in direct contact with myoma) continuing to cut the myoma with visualization.
FIGURE 8 Resect technique—4 steps in resecting a submucous myoma

Once through the myoma, the loop is withdrawn into the hysteroscope.
Management of complications
The primary complications of hysteroscopic myomectomy are bleeding, infection, uterine perforation, and fluid overload.
Bleeding. If postoperative hemorrhage occurs, use a 30-cc Foley balloon to tamponade the vessels, or pack the uterus with gauze soaked in a vasopressin solution. Both can be removed any time from 4 hours to 24 hours following placement. If bleeding persists, uterine artery embolization should be considered prior to hysterectomy.
Most attempts at controlling bleeding with a rollerball are futile because the intrauterine distention pressure necessary to see the venous bleeders hides the actual bleeding. Arterial bleeders can be seen and controlled with the rollerball, but they are much less common.
Infection. Because infection is uncommon with hysteroscopic surgery, routine prophylaxis is unnecessary.
Antibiotics should be used if the patient had cervical laminaria placed preoperatively.
Uterine perforation. The management of uterine perforation depends on the site of perforation and whether energy was used during the perforation. For example, if the perforation was at the fundus and occurred with a blunt, non-energized instrument, observation without laparoscopy is sufficient. If the perforation was lateral or occurred with RF energy, laparoscopy is suggested to rule out a broad ligament hematoma or injury to intraperitoneal vessels and viscera. If the perforation is anterior, a cystoscopy is recommended; internal colon inspection is necessary if the perforation is posterior.